
If you’re looking for a way to take your arcade gaming experience up a notch, converting your Arcade1Up machine to a Raspberry Pi mod is definitely the way to go.
With the right tools and some basic know-how, you can turn your classic arcade cabinet into an interactive masterpiece by using the Pi as the main computing unit instead of the pre-built hardware that comes with the unit.
Not only will this allow you to play a wider variety of retro arcade games, but you can also add all sorts of customizations to your cabinet such as LED lights, sound effects, and even more modern gaming options.
So if you’re ready to take your retro gaming experience to the next level, read on and find out how to convert your Arcade 1Up to Raspberry Pi!
What You’ll Need To Convert Arcade 1 UpCabinet To Raspberry Pi
Before you start any conversion process, it’s important to make sure that you have all of the necessary components.
Here is a list of what you’ll need to convert Arcade1Up to Raspberry Pi:
-
Video Converter Board
This will allow you to plug in any computer that runs HDMI into the Arcade1Up’s display. -
A Computer
In this post, we’ll be using a Raspberry Pi with a micro SD card. -
A USB Encoder Board
These connect with your computer and help your Pi device understand the signals sent from your controllers/joysticks. -
Speakers
To play in-game audio through.
Now, we’ll walk you through each of these components in greater detail and how to incorporate the upgrades into your Arcade1Up cabinet.
Source And Install Video Converter Board
The first thing you need to convert an arcade cabinet to Raspberry Pi is a video converter board. This board will allow you to plug any computer with an HDMI port (such as the Raspberry Pi) into your cabinet’s monitor.
You’ll need this component because the monitor that comes with most Arcade1Up products doesn’t have standard computer display connections like VGA or HDMI. They’re simple LCD panels.
When shopping for a converter board, make sure to get one that has compatibility with your type of cabinet.
To install the converter board, follow these steps:
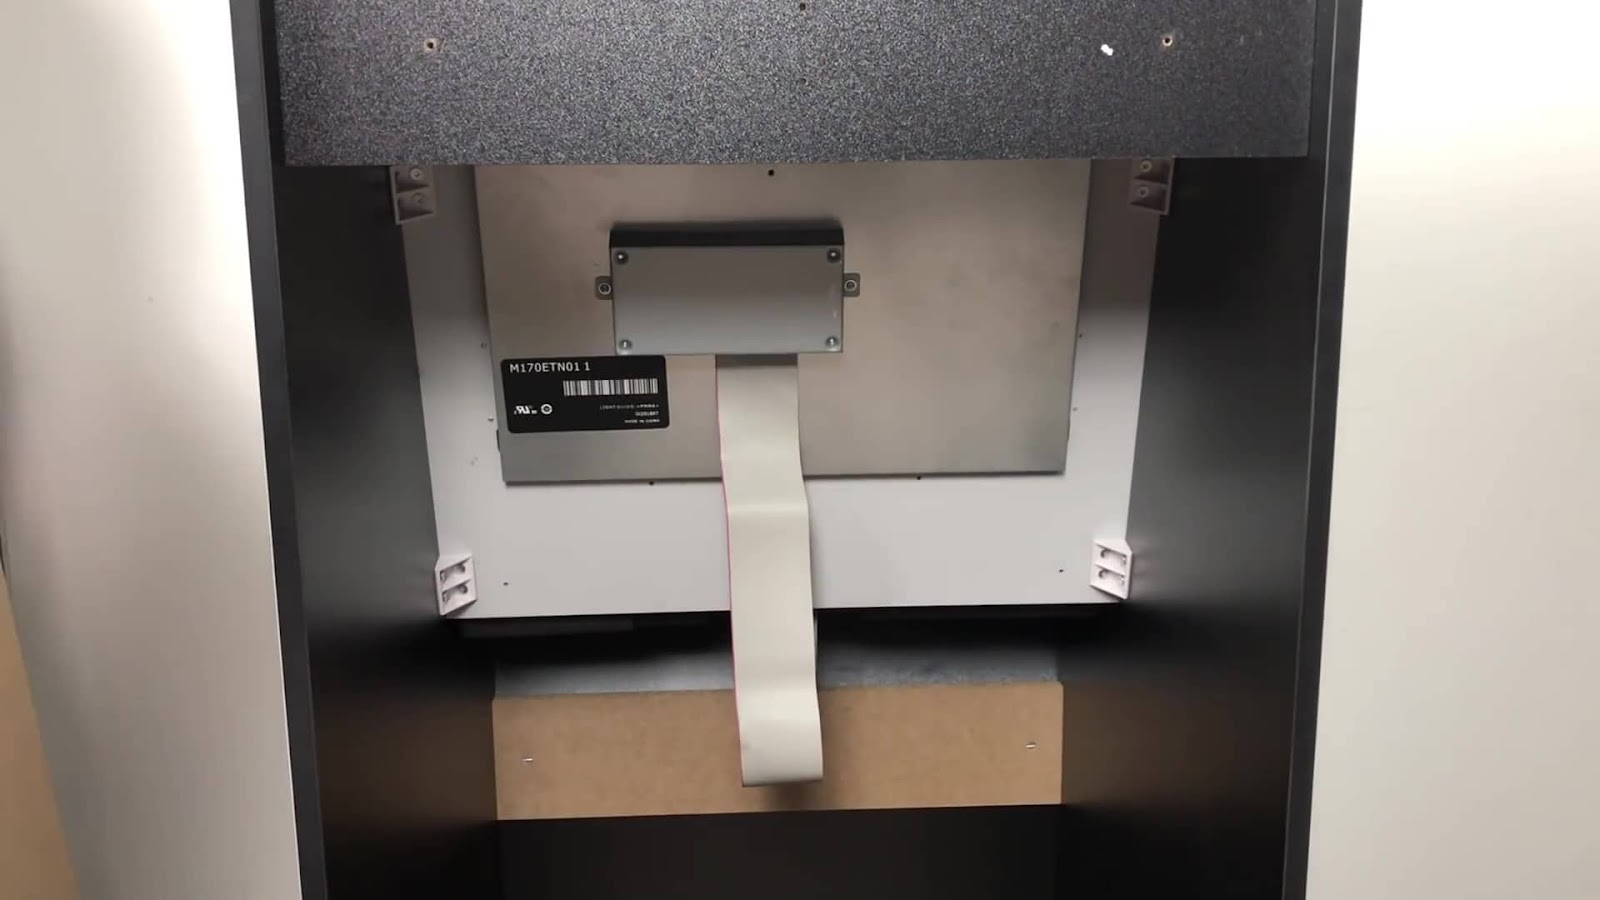
- Gain access to your Arcade1Up’s monitor through the back panel. Here, you’ll find a box with a few screws in them. Remove them.
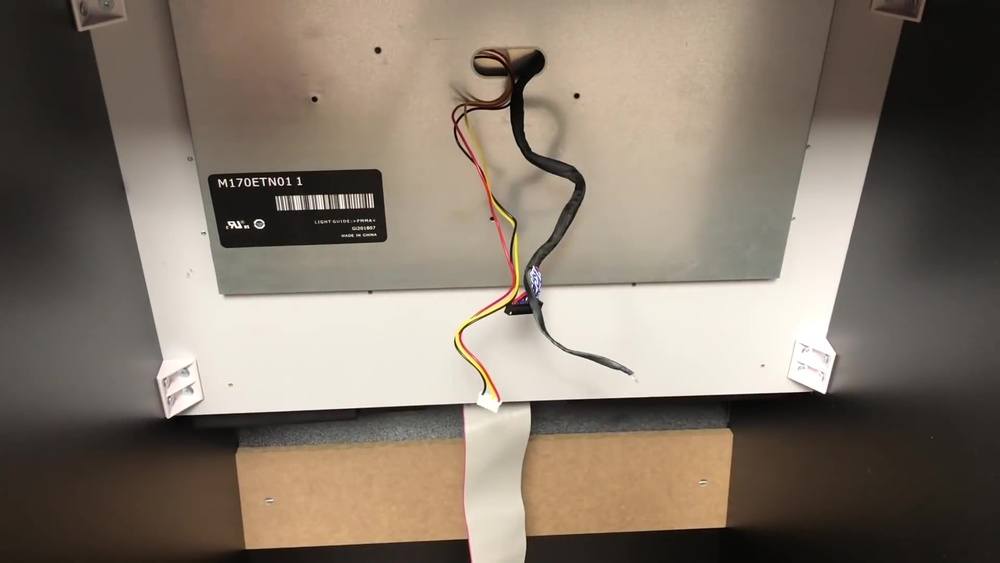
- Then remove the box, power cords, connectors, and the ground wire.
- Now, mount the new board using whatever you have at hand – duct tape, zip ties, or even command strips.
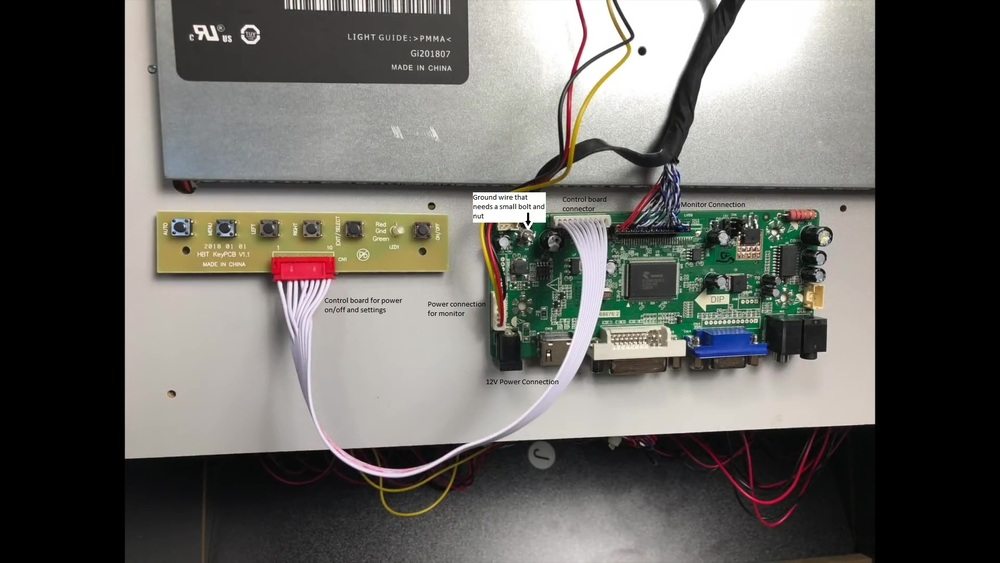
- Lastly, insert the stock arcade cabinet’s LCD power supply connector that you originally unplugged into this new video board.
Top Tip: Be sure to plug in an HDMI or VGA cable into your connector board to check if the display is working properly before proceeding further.
Install The New Processing Computer
The processing unit or computer you use is entirely up to you. We obviously recommend the Raspberry Pi, but any other type of small computer that fits your budget and needs will also work.
However, it’s recommended you use a Pi device if you can. They’re small, HDMI compatible, don’t use a lot of power, have all the components built-in, and are cheap to boot!
Plus, they’re easy to set up and also let you flash video game “image” and ROM files onto them relatively easily.
You just need to connect a Pi with the appropriate ROM files to your cabinet’s display, then plug in a USB encoder for control mapping (more on that below) and you’re usually good to go!
Just remember that due to their slow processing speeds, most Pi devices won’t be able to run heavy 3D games. For those, you’ll need the processing speed of a PC.
But if you’re planning on exclusively emulating 2D arcade games from the 90s then don’t worry.
You won’t need much processing power to handle games from that era so don’t bother splurging on the newest Pi device. Remember, the best Raspberry Pi for Arcade 1Up mods is one that you have lying around.
Top Tip: If you’re an emulation expert, you probably already have a massive library of retro game ROM images. But if you’re new and want to know how to add games to Arcade 1Up using a Raspberry Pi, read this guide here.
Install USB Encoder & Upgrade Controls
The next step is to set up the USB encoder and controls. The buttons and control sticks that come with Arcade 1Up cabinets are usually poor quality so it’s usually best to upgrade them during the conversion process.
But even if you choose to stick with them, you’ll still need to set up the USB encoder for your new Pi computer to process and register joystick movements and button presses.
You can find a variety of options online, such as custom kits from sites like Ultimarc.com, which come with everything you need for the conversion. Just make sure that the buttons you get are compatible with your computer and joystick type.
Installing them is as easy as connecting each button to its respective pin on the USB encoder board (this will be provided in the kit). Then plug the USB encoder board into your Pi’s USB port.
Here’s an example of a Raspberry Pi mod USB encoder
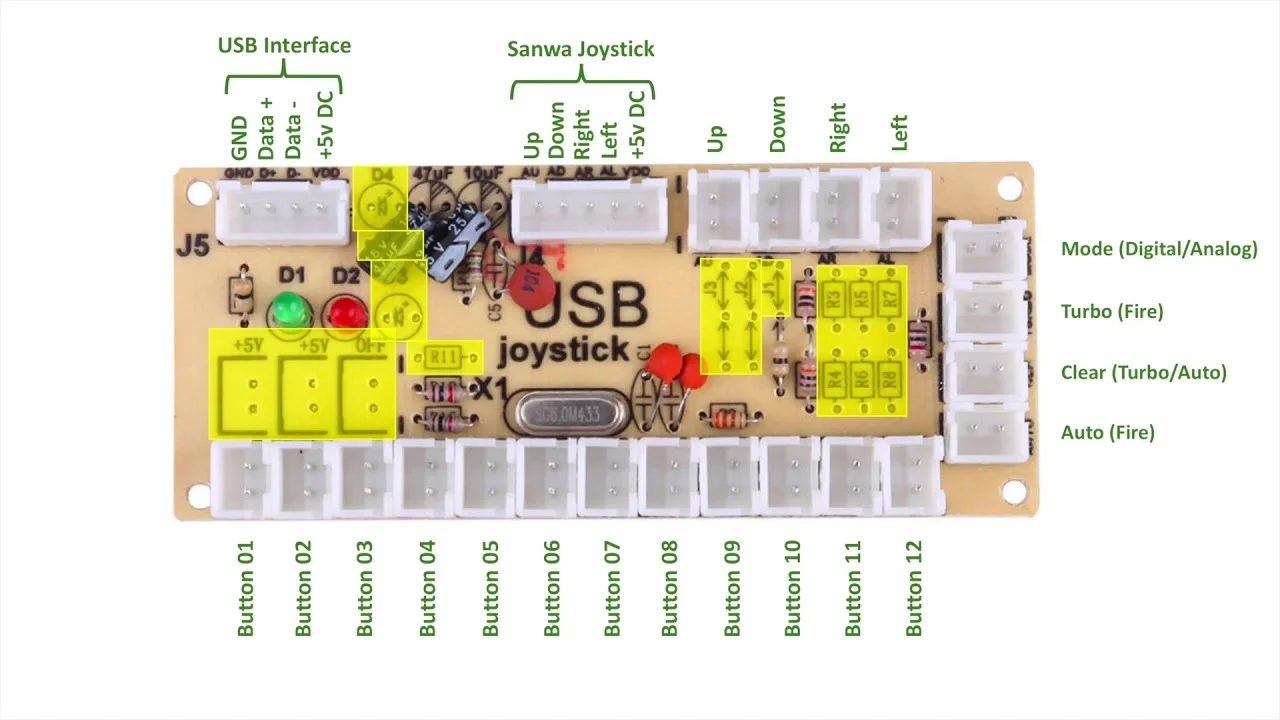
Top Tip: Most encoders have a wiring diagram provided with them. If you stick to the instructions in the diagram and plug in each button correctly, the Pi will know exactly what each button press is supposed to do, jump, attack, etc.
Get The Sounds Pumping
The last component you’ll need to convert Arcade1Up to Raspberry Pi are the speakers. This will allow your system to play game audio through the arcade cabinet, adding another layer of immersion as well as allowing you to hear your games more clearly.
You can buy powered computer speakers that come with their own amplifiers or you can build your own. You’ll need a few components for this, such as an amplifier board and some speakers – both of these are easily available online.
Just make sure that you get an amplifier and speakers that will fit in the cabinet. You can do this by measuring the inside of your cabinet and finding speakers that fit in those dimensions.
Once you’ve chosen your speakers, follow the instructions from the amplifier board to connect them properly to your Raspberry Pi using a 3.5mm audio cable.
After the components are connected, you should be able to hear game music playing through the arcade cabinet.
The Takeaway: How To Convert Arcade 1Up To Raspberry Pi
So, there you have it!
You now know how to convert Arcade 1Up to Raspberry Pi. As long as you have the right tools and some patience, the conversion process isn’t too difficult.
And if you’re still worried that you might mess up what components to buy then don’t be. You can always buy complete Arcade 1Up mod kits (along with other gaming console kits) online to make the conversion process even simpler.
We hope this article helped you get started on your own retro arcade Raspberry Pi modding project. Good luck and happy gaming!
ETA Prime has put together an awesome instructional video showing you step-by-step exactly what you need to do to convert your Arcade1Up cabinet to a Raspberry Pi. Be sure to check it out, and give them a like and subscribe if you find it helpful.