
The Raspberry Pi 4 (formerly Raspbian) is without a doubt the greatest single-board computer that you can buy. The Raspberry Pi’s processor is an ARM Cortex A-72 operating at a maximum speed of 1.5 GHz.
A clock within this computer is just an electrical pulse that maintains the rest of the CPU’s (Central Processing Unit) components in sync. A 1.5 GHz clock can update 1.5 billion times per second.
However, what if we told you that you could significantly improve its already outstanding performance? This would be beneficial for the overwhelming majority of applications.
Well, today, we will demonstrate to safely overclock the Raspberry Pi 4 from 1.5 GHz to the much higher 2.147 GHz! To finish, we will walk through overclocking older versions of Raspberry Pi software so no one is left out.
Overclocking is when you increase the processor’s clock speed over the processor’s default speed. You can dramatically boost performance by overclocking both the GPU (Graphics Processing Unit) and CPU.
This procedure can overclock the CPU to 2.147 GHz and the GPU to 750 MHz. Its default is usually 500 MHz. This kind of speed is the top-of-the-line desktop computer speed.
What Are The Benefits Of Overclocking The CPU?
When the CPU on Raspberry Pi is overclocked, the base speed increases from 1.5 GHz to 2.147 GHz, though this depends on what cooling method is used. To optimize your Raspberry Pi’s performance, you must overclock it, since several applications perform better and smoother when overclocked.
But what are the actual benefits? The list below shows all of the ways that overclocking your Raspberry Pi can improve your computer performance.
Desktop Performance
In general, overclocking your Raspberry Pi can drastically improve your desktop performance, making everything run faster and smoothie
Retro Gaming
Do you love the classic gaming consoles like the PlayStation 1, RecalBox, Sega Dreamcast, or the Nintendo N64? Then you should overclock your Raspberry Pi (see also ‘How To Overclock Raspberry Pi 3‘). This will massively improve your gaming experience, making everything look smoother despite them being older consoles and games.
ExaGear
Do you use Windows 10 on your Raspberry Pi? Then overclocking will significantly enhance performance.
Kodi
If video streaming is your thing then overclocking can prevent any performance issues that may occur when you are using Kodi. It is also very useful if you regularly use a VPN, as this can sometimes slow the performance of your computer.
How To Overclock Raspberry Pi 4
This is a multistep process, Every step must be followed exactly to ensure that you get the maximum performance possible.
Things You Need
There are a few key things you need to have on hand to overclock the Pi. They are:
- Raspberry Pi 4
- Power supply – an official one is recommended but you can probably get away with any
- Cooling method or solution
- SD card – must be installed with Raspberry Pi OS
- USB mouse and keyboard – optional
A cooling solution with active cooling is vital, as Raspberry Pi may reach very hot temperatures of over 80°C even when not overclocked. Passive cooling is not enough. So, when overclocking it, an effective cooling system is required to keep the hardware free from damage
A great cooling option to pick is the GeeekPi’s ICE Tower Cooler. This can efficiently cool the CPU from a temperature of 80°C down to roughly 40°C.
This is done by the use of multi-layer heatsinks, a tower-style chassis, a copper tube in 5mm, and a powerful seven-blade fan. All of these aspects contribute to its exceptional performance as a radiator for Pi 4.

1. Update Raspberry Pi
Whether or not you are overclocking Raspberry Pi 4 now, you should always update the computer to the newest version as soon as you can. Even if it is only a small update, it has been made to optimize performance and fix some tiny bugs that overall improve the experience of using it.
Here is how you update Raspberry Pi 4.
- Open a terminal and insert the commands below one at a time:
- sudo apt update
- sudo apt dist-upgrade
- Once done you have to reboot the system to restart Raspbian. To do this enter the following code – sudo reboot
2. Check Default Speed
Now check the speed the CPU is running at before continuing with the next steps. To do this, you have to open enter the code below into the terminal:
- cat /sys/devices/system/cpu/cpu0/cpufreq/scaling_cur_freq
This code will give you the speed specified in the Kernel. The terminal likely will return a result of 600000, indicating that your CPU’s base frequency is 600 MHz (0.6 GHz).
If Pi 4 is throttled as a result of low voltage or excessive CPU temperature, the real CPU speed could be lower. If you want to get the current speed, enter the command below into the terminal:
- vcgencmd measure_clock arm
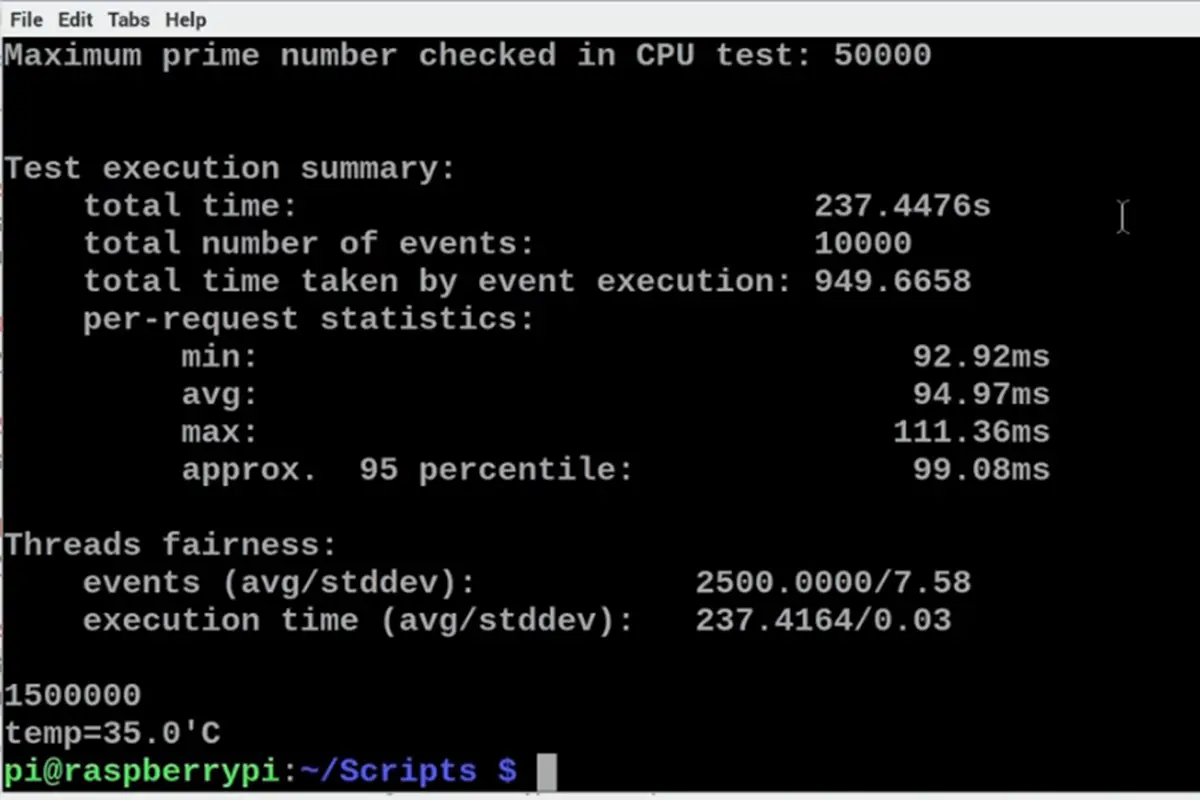
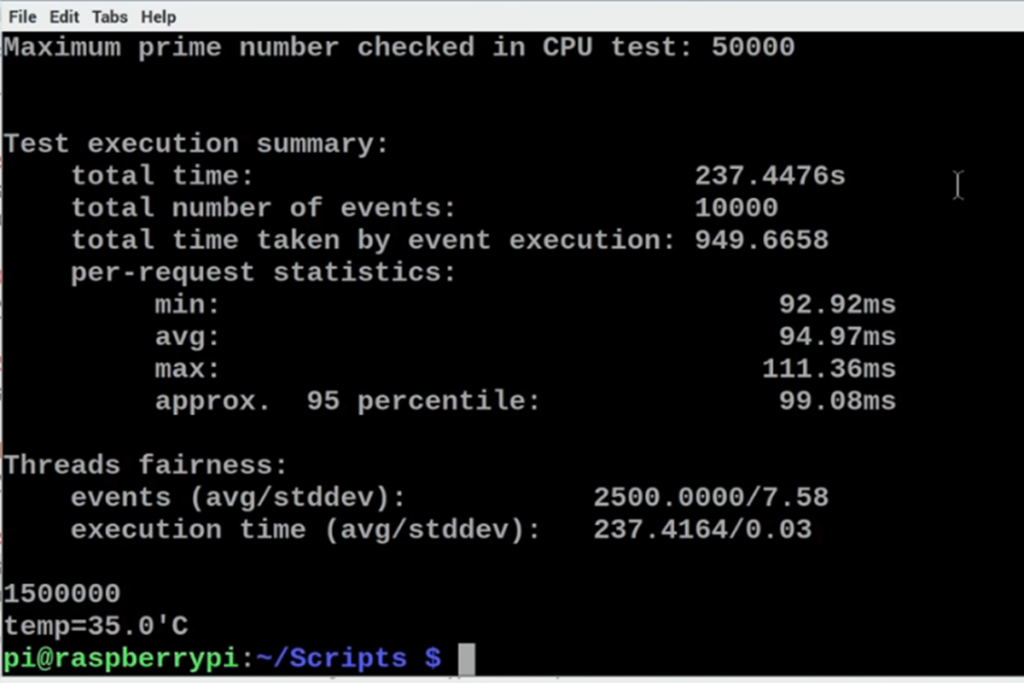
When using Raspberry Pi, you’ll see the speed gradually increase from the needed speed to the maximum of 1500000. Rather than inputting the command constantly, you can use the watch command to observe the speed continually. This is:
- watch -n 1 vcgencmd measure_clock arm
This command lets you keep up to date with the current speed, which is updated every second. After you have finished the overclocking process, you should see that the speed has gone above 1500000 ( 1.5 GHz).
3. Overclocking Raspberry Pi 4
When overclocking Raspberry Pi, you need to modify the Config.txt file that you can find in the menu of core configuration settings. What you are essentially doing is setting a new upper limit of the clock frequency.
To do this, you need to open a new terminal window. Then, enter the following code:
- sudo nano /boot/config.txt
Once done, find the section called:
- #uncomment to overclock the arm. 700 MHz is the default.
- #arm_freq=800
Change this configuration setting to:
- #uncomment to overclock the arm. 700 MHz is the default.
- over_voltage=2
- arm_freq=1750
Once done, you have to save the file. To do this, either press the RETURN key
or use the shortcut CTRL+O. Then you have to restart your Raspberry Pi. To do this, enter the code below:
- sudo reboot
When everything has booted up and loaded correctly, you can check to see if the clock speed has gone up. Use the code below to do this:
- watch -n 1 vcgencmd measure_clock arm
If you look at a few web pages after entering the above code, you should be able to see the clock speed increasing to 127500000.
4. Optional Step – Overclocking To A Higher Speed – 2GHz
Once you have initially overclocked your Raspberry Pi, it is possible to make it even faster and take it to 2GHz. While this is not necessary, if your whole system can support this faster speed then why not give it a go?
To do this, you have to follow the same steps you can see above but with a few added pieces of code.
You need to start by once again editing the config.txt file and changing the over-voltage setting to 6. Then set the ARM CPU to 2.0GHz. To do all this, ender the following code:
- over_voltage=6
- arm_freq=2000
Reboot your Raspberry Pi 4 once again and you should see that it will be at 2GHz. If you want to see this in action, run the following code:
- watch -n 1 vcgencmd measure_clock arm
5. Optional Step – Overclocking To The Maximum Speed
It is possible to increase the speed even more to a level of 2.147 GHz. Before you do this though, it is important to note that testing indicated that certain Raspberry Pi 4 boards failed to boot or throttled down due to overheating/low voltage when forced to go at these high speeds.
Additionally, maintaining this maximum speed for a lengthy period with your Pi is not possible. As a result, we highly suggest you either agree on arm freq=2000 or stop at step 5 above.
But if you want to give this a go anyway, then here is how to do it.
Once again, you will have to make alterations to the config file. For this step, you will have to set the arm_freq to 2147 and gpu_freq to 750. To do this, enter the code below:
- over_voltage=6
- arm_freq=2147
- gpu_freq=750
Next, save and close the file by pressing CTRL+O and CTRL-X. Then, reboot the Raspberry Pi. You should be able to see that your computer is working at a speed of 2.147 GHz.
As we mentioned previously, you can watch this in action by entering the code:
- watch -n 1 vcgencmd measure_clock arm
Are There Any Dangers?
Overclocking Raspberry Pi OS may result in it crashing, and there is a strong chance that your microSD card may become corrupted. Because this is a big risk, you must ensure that any important data is stored on a backup SD card (see also ‘Backup your Raspberry Pi: How To Save And Restore Files‘) that is kept somewhere separately.
If applications stop working or the Raspberry Pi OS refuses to boot, you must reset to the default speeds (see also ‘How to Reset Raspberry Pi‘).
What Happens If Overclocking Fails?
The vast majority of overclocking issues will reveal themselves immediately as a failure to turn on the computer. If you are experiencing this difficulty after overclocking your Pi, simply press the SHIFT key when rebooting your Pi to resolve the issue.
Overclocking may be temporarily disabled using this approach, allowing the Pi to boot normally while overclocking is disabled. It is then essential to launch it and make any necessary modifications to the config.txt file (Refer to step 5).
Removal of the SD card and reinsertion of the card into a separate computer is another possibility for addressing the overclocking issue. Delete the config.txt file in that directory and replace it with the one you want to use.
Can Older Versions Of Raspberry Pi Be Overclocked?
Other Raspberry Pi models can be overclocked as well. However, you must take reasonable safety measures to make sure that the computer is sufficiently cooled and that adequate power is given by a competent power source. We strongly suggest that you use the official Pi charger since mobile chargers or other regular chargers will not provide enough power.
Furthermore, always double-check your model’s default clock speed. Also, avoid boosting it by 10% or more.
The Raspbian operating system includes everything you need to overclock an older Raspberry Pi device. So that you understand what we mean, we will briefly explain how to overclock the older Raspberry Pi 2 B computer.
- From the desktop, open the configuration tool. To do this go to Preferences > Raspberry Pi Configuration. This can also be done by entering the following code:
sudo raspi-config
2. Pick the Overclock option from the menu
3. The following screen that you should see should provide a range of preset settings from where you may pick the desired overclocking option. By default, the chosen option will be None. Depending on the model of your Raspberry Pi, you will be presented with a selection of five possibilities.
4. To show the overclocking procedure in this guide, we are using an old Pi 2 Model B. There is only one option other than the default ‘None’ option in this case.
5. All that remains is for you to choose the needed choice and click OK to apply.
6. It is recommended that you alter the config.txt file and make the appropriate adjustments while undertaking non-standard overclocking.
7. Simple adjustments can be made to the parameters (as previously described) and then tested to see what occurs. In the case that something goes wrong with the overclocking, go to the section above on recovering from a failed overclock.
Summary
After reading this article, we hope you now have a better grasp of how to overclock Raspberry Pi 4. Remember that when you are overclocking your Raspberry Pi 4, you must follow the instructions exactly as they are described above.
Not doing so could result in irreparable damage done to your computer, not to mention the loss of any important data that may be stored on SD cards.
It is also very important to have sensitive or important data stored on separate SD cards for safety anyway, as you can never know when something may go wrong with your technology.
If you have successfully overclocked your Raspberry Pi, then you may be tempted to go all the way and try to get it to the max speed of 2.147 GHz. However, this is unsustainable for basically all computers, so unless you have a very powerful one it is not recommended that you do this.
Stopping at 2GHz or even 1.5GHz should make your computer run at its optimal performance.