
The Raspberry Pi is a versatile device capable of handling various tasks, including serving as a central hub for multiple hard drives. This setup can transform your Pi into a powerful network-attached storage (NAS) system, media server, or backup solution. In this guide, we’ll explore how to connect multiple hard drives to your Raspberry Pi, ensuring optimal performance and reliability.
Understanding the Capabilities of Raspberry Pi
Before diving into the setup, it’s essential to understand the Raspberry Pi’s hardware limitations. Models like the Raspberry Pi 4 are equipped with USB 3.0 ports, offering faster data transfer rates suitable for handling multiple hard drives. However, the Pi’s power supply and USB bandwidth can become bottlenecks if not appropriately managed.
Selecting the Appropriate Hardware
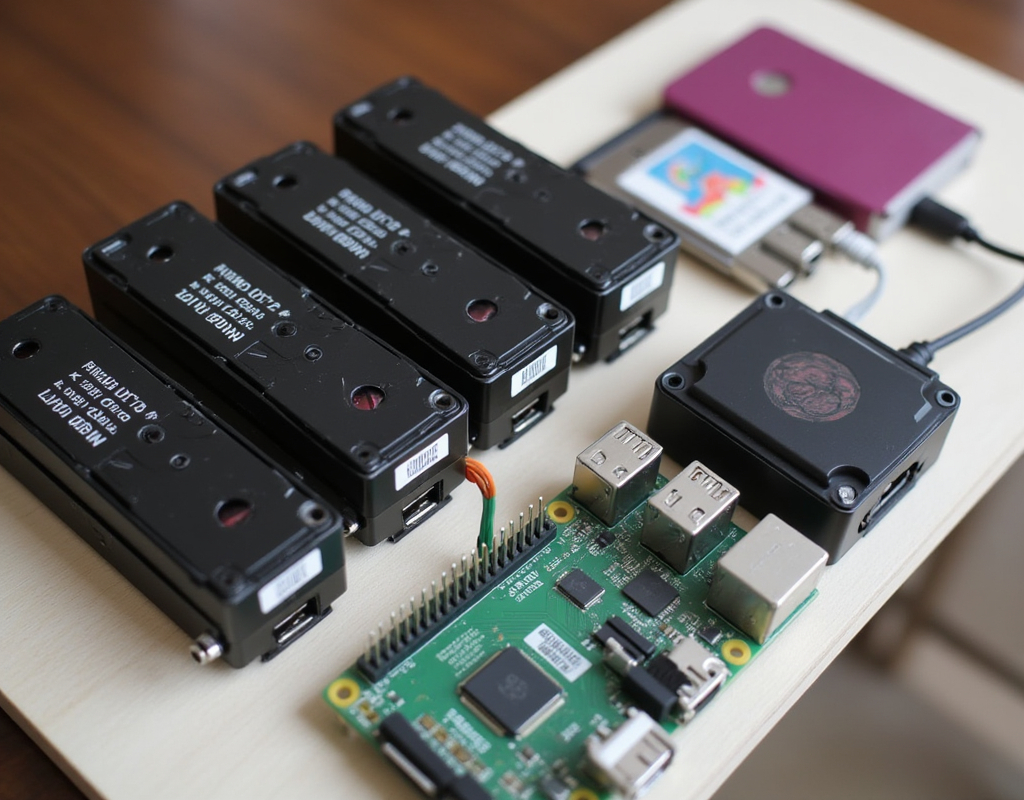
To successfully connect multiple hard drives to your Raspberry Pi, consider the following components:
- Raspberry Pi Model: The Raspberry Pi 4 is recommended due to its enhanced performance and USB 3.0 ports.
- Hard Drives: Both 2.5-inch and 3.5-inch HDDs or SSDs can be used. Note that 3.5-inch drives require an external power source, while 2.5-inch drives can sometimes be powered via USB, depending on their power requirements.
- Powered USB Hub: A powered USB hub is crucial to provide sufficient power to multiple drives and prevent overloading the Raspberry Pi’s power supply. This setup ensures stability and prevents potential data corruption.
- SATA to USB Adapters: If you’re using internal SATA drives, you’ll need reliable SATA to USB adapters to connect them to the USB hub.
- Power Supply: Ensure that both the Raspberry Pi and the USB hub have adequate power supplies. The official Raspberry Pi power supply is recommended for the Pi, and the USB hub should have a power rating that can handle the combined load of all connected drives.
Connecting the Hard Drives
Set Up the Powered USB Hub: Place the powered USB hub near your Raspberry Pi and connect it to a reliable power source.
Connect Hard Drives to the USB Hub: Use SATA to USB adapters to connect your hard drives to the USB hub. Ensure that each drive is properly connected and powered, especially for 3.5-inch drives that require external power.
Connect the USB Hub to Raspberry Pi: Attach the USB hub to one of the Raspberry Pi’s USB 3.0 ports to take advantage of faster data transfer speeds.
Power On the Raspberry Pi: Once all connections are secure, power on your Raspberry Pi. The connected hard drives should be recognized by the system.
Click Here For The Best Raspberry Pi Gear & Accessories!
Configuring the System
After physically connecting the hard drives, you’ll need to configure your Raspberry Pi to recognize and manage them effectively.
Update the System: Ensure your Raspberry Pi OS is up to date by running:
sudo apt update && sudo apt upgradeInstall Necessary Packages: Install ntfs-3g if you plan to use NTFS-formatted drives:
sudo apt install ntfs-3gIdentify Connected Drives: List the connected drives using:
lsblkThis command displays all connected storage devices, helping you identify their device names (e.g., /dev/sda, /dev/sdb).
Create Mount Points: For each drive, create a directory where it will be mounted:
sudo mkdir /mnt/drive1 sudo mkdir /mnt/drive2Mount the Drives: Mount each drive to its respective mount point:
sudo mount /dev/sda1 /mnt/drive1 sudo mount /dev/sdb1 /mnt/drive2Automate Mounting at Boot: To ensure the drives mount automatically at boot, edit the /etc/fstab file:
sudo nano /etc/fstabAdd the following lines:
/dev/sda1 /mnt/drive1 auto defaults,nofail 0 0 /dev/sdb1 /mnt/drive2 auto defaults,nofail 0 0Save and exit the editor. This configuration ensures that the system attempts to mount the drives at boot without causing boot failures if a drive is missing.
Implementing RAID for Enhanced Performance and Redundancy

Setting up a RAID (Redundant Array of Independent Disks) can improve performance and provide data redundancy. The mdadm tool is commonly used for this purpose.
Install mdadm: Install the RAID management tool:
sudo apt install mdadmCreate a RAID Array: For example, to create a RAID 1 array:
sudo mdadm --create --verbose /dev/md0 --level=1 --raid-devices=2 /dev/sda1 /dev/sdb1This command sets up a mirrored array, providing redundancy.
Monitor the RAID Array: Check the status of the RAID array:
cat /proc/mdstatThis file shows the current status of RAID devices.
Create a Filesystem on the RAID Array: Format the new RAID array:
sudo mkfs.ext4 /dev/md0sudo mkdir /mnt/drive1 sudo mkdir /mnt/drive2Replace drive1 and drive2 with meaningful names that reflect the purpose of each drive.
- Mount the Drives: Mount each drive to its respective directory:
sudo mount /dev/sda1 /mnt/drive1 sudo mount /dev/sdb1 /mnt/drive2If the drives are formatted with a file system like NTFS, ensure you use the appropriate options when mounting (e.g., ntfs-3g for NTFS drives).
- Set Up Automatic Mounting: To ensure the drives are automatically mounted on boot, add entries to the
/etc/fstabfile:
sudo nano /etc/fstabAdd lines for each drive:
/dev/sda1 /mnt/drive1 ext4 defaults 0 2 /dev/sdb1 /mnt/drive2 ntfs defaults 0 2Save and exit the file (Ctrl+O, Enter, Ctrl+X). Test the configuration by rebooting your Raspberry Pi and verifying that the drives are mounted.
Click Here For The Best Raspberry Pi Gear & Accessories!
Managing Multiple Drives with RAID
If you’re looking for better performance or data redundancy, setting up RAID (Redundant Array of Independent Disks) is an excellent option.
Installing RAID Tools
First, install the mdadm tool:
sudo apt install mdadmConfiguring a RAID Array
For example, to set up a RAID 1 (mirrored) array with two drives:
sudo mdadm --create --verbose /dev/md0 --level=1 --raid-devices=2 /dev/sda1 /dev/sdb1This command creates a new RAID array (/dev/md0) using the two drives. You can monitor the RAID setup using:
cat /proc/mdstatFormatting and Mounting the RAID Array
After creating the RAID array, format it:
sudo mkfs.ext4 /dev/md0Then mount it as you would a single drive:
sudo mount /dev/md0 /mnt/raidAdd it to the /etc/fstab file for automatic mounting on boot:
/dev/md0 /mnt/raid ext4 defaults 0 2Optimizing for Performance and Stability
To ensure the best performance and reliability, follow these additional tips:
File System Selection
Choose the most appropriate file system:
- EXT4: Best for Linux environments, offering stability and performance.
- NTFS: Useful for compatibility with Windows systems but slower on Linux.
Power Management
Ensure your powered USB hub and Raspberry Pi power supply are sufficient for your setup. A reliable hub prevents drives from disconnecting due to power issues.
Cooling
Use heat sinks or fans for your Raspberry Pi and drives, especially during intensive tasks like large file transfers or RAID rebuilds.
Alternative Use Cases for Connected Drives
Beyond storage expansion, connecting multiple drives opens up other opportunities:
- Network Attached Storage (NAS): Use software like Samba or OpenMediaVault to create a centralized storage solution accessible across your network.
- Media Server: Install Plex, Kodi, or Jellyfin to stream movies, music, and TV shows directly from your Raspberry Pi.
- Backup Solution: Automate backups for your computers using tools like
rsyncorDeja Dup. - Data Archival: Store and organize large datasets or archives, making them easily retrievable.
Troubleshooting Common Issues
When connecting multiple drives, you might encounter some challenges:
- Drives Not Recognized: Ensure the drives are connected securely, and check if the powered USB hub is functioning properly.
- Power Issues: If drives disconnect randomly, your USB hub may not provide enough power.
- Performance Bottlenecks: Use USB 3.0 ports for faster speeds, and avoid using too many devices on the same hub to prevent bandwidth limitations.
Click Here For The Best Raspberry Pi Gear & Accessories!
Conclusion
Attaching multiple hard drives to a Raspberry Pi is a cost-effective way to create a powerful storage solution. Whether you’re building a NAS, a media server, or a backup system, proper planning and configuration are essential to ensure success. With the right hardware, thoughtful software setup, and attention to power and cooling needs, your Raspberry Pi can handle multiple drives seamlessly.
Take your Raspberry Pi projects to the next level by leveraging its potential for storage and data management. Start exploring and make the most out of your Raspberry Pi today!