
Are you running out of disk space on Raspberry Pi that is running Ubuntu OS? Maybe you’re getting warning messages that your root partition is almost full, and you’re not sure what to do about it.
Well, don’t worry, because in this post we’re going to tackle the topic of how to resize and expand Ubuntu partitions on your Raspberry Pi. With a few simple steps, you’ll be able to increase your storage capacity and keep your Pi running smoothly.
Let’s dive in.
Click Here For The Best Raspberry Pi Gear & Accessories!
Before You Start Expanding Ubuntu partitions
Before we discuss how to resize and expand Ubuntu partitions, there are a few things you need to have in order. Here are the prerequisites to make sure you have before diving in:
-
A backup of your important data
First things first, make sure you have a backup of your important data. Seriously, don’t skip this step. There’s always a chance that something could go wrong when you’re working with partitioning or disk management, and you don’t want to lose your precious files.
-
Enough free space
You need to have some free space on your hard drive to expand the partitions. If you don’t have any free space available, you’ll need to delete some unnecessary files or move them to an external storage device.
-
Gparted:
This is a powerful yet user-friendly partition editor that you’ll use to resize and expand Ubuntu partitions. Gparted is typically included with most Linux distributions, including Ubuntu. If it’s not installed on your system, you can easily install it using the command line or the Ubuntu Software Center.
-
Time
Expanding partitions can take some time, especially if you’re working with a large hard drive. Be prepared to dedicate enough time to the process and don’t rush through the steps – even if you’re in a hurry!
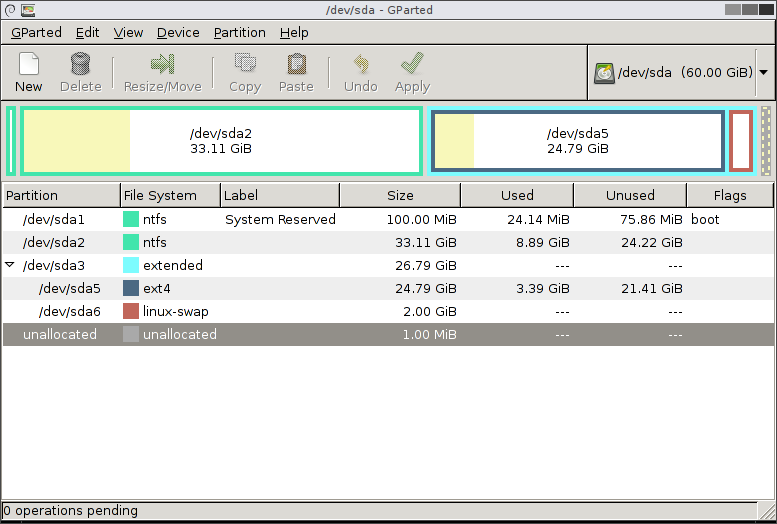
How To Resize And Expand Ubuntu Partitions Using Gparted (GUI)
Now that you have everything you need, it’s time to dive into the process of resizing and expanding Ubuntu partitions. Here’s a step-by-step guide to get you started:
-
Launch Gparted
Open up Gparted, either from the command line or by searching for it in your application menu. Make sure you have administrative privileges so that you can make changes to your partitions and unmount them if needed.
-
Identify the partition you want to expand
Look for the partition you want to expand in the list of partitions. It should be labeled with the file system type and the amount of space it currently occupies.
-
Shrink the neighboring partition (if necessary)
If the partition you’d like to expand is surrounded by other partitions, you’ll need to shrink the neighboring partition(s) to make room. Right-click on the partition and select “Resize/Move”. Then, drag the slider to shrink the partition and create some unallocated space.
-
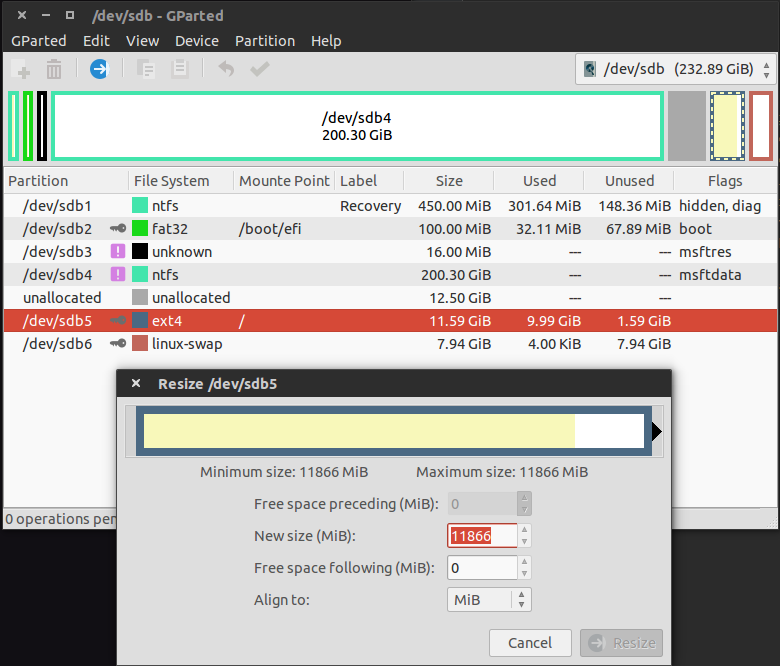
Expand the partition
Now it’s time to expand the partition you want to enlarge. Right-click on the partition and select “Resize/Move”. Drag the slider to the right to increase the partition size and take advantage of the unallocated space.
RELATED: How To Partition A USB Drive
-
Apply the changes
Once you’re happy with the partition sizes, click the “Apply” button in the toolbar. Gparted will show you a summary of the changes you’re about to make. If everything looks good, click “Apply” again to confirm the changes.
-
Wait for the changes to take effect
The partition resizing process can take a while, depending on the speed of your hard drive and the amount of data you have stored on it. Don’t panic if it takes a while – just sit back, relax, and let Gparted do its thing.
-
Reboot
Once the changes have been applied, you’ll need to reboot your computer for the changes to take effect. Don’t forget to save any open files and close any running programs before you reboot.
And that’s it! You’ve successfully resized and expanded your Ubuntu partitions. Now you can enjoy more space on your hard drive and an optimized Ubuntu experience.
Click Here For The Best Raspberry Pi Gear & Accessories!
Optional: Ubuntu Expand Root Partition
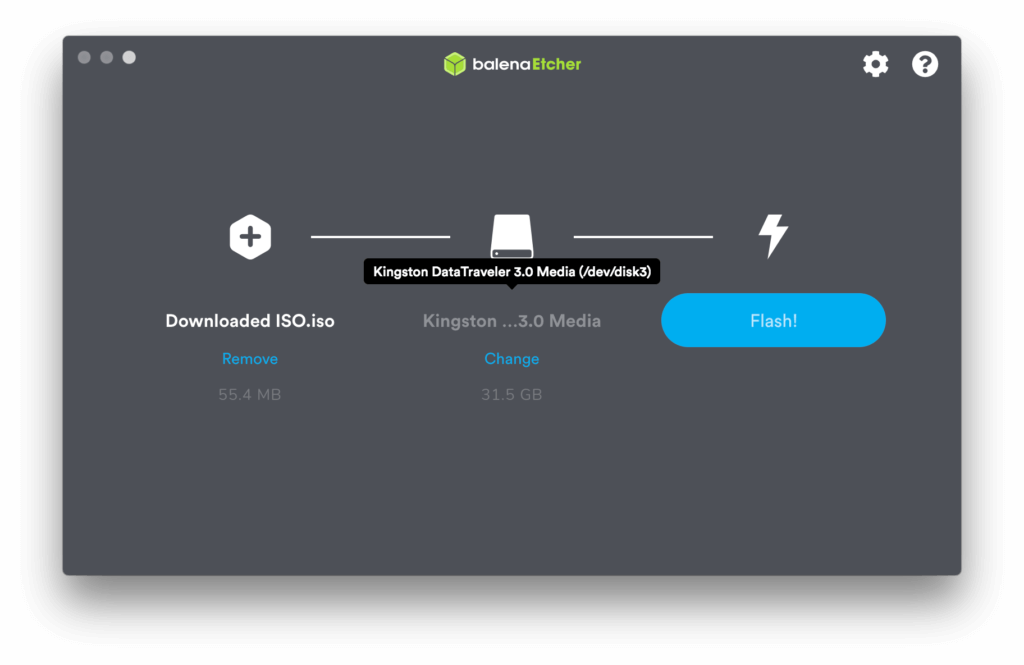
Expanding the Ubuntu system partition is a bit trickier than expanding a regular data partition, but it’s still doable with the right tools and knowledge.
This is mainly because if you want to resize a partition, you need to unmount it first. However, the system partition can’t be unmounted, which is why you may need to boot on a Live-USB key.
Here’s how to expand Ubuntu server partition:
-
Download Ubuntu from the official website.
-
Flash it on a USB key using a tool like Etcher or Rufus.
-
Insert the USB key into your computer, and boot on it by pressing F12 or DEL (depending on your computer) to access the boot menu.
-
Choose the live boot option (remember, we’re not looking to reinstall Ubuntu).
-
Once you’re in the Live-USB environment, you can follow the same steps as if your partition is no longer hosting your system.
Top Tip: It’s important to note that this process is only required if you want to extend the system partition. In other cases, you can resize the partition directly from your Ubuntu session (as discussed previously).
How To Resize And Expand Ubuntu Partitions Using Command Line
If you’re comfortable with using the Terminal, you can also resize and expand Ubuntu partitions using Command Line.
Here’s how:
-
Ensure that the partition isn’t mounted
Type the following command and adjust the parameter to fit your partition name:
This will unmount the partition so you can safely modify it. -
Open fdisk to make changes to the partition table
This will open the fdisk utility, which lets you manage partitions on your disk. -
Delete the corresponding partition
Type the corresponding number (in this example, it’s “1”). If you have multiple partitions, adjust the number accordingly. Remember, this won’t format your disk’s content, it’ll just delete the partition so you can create a new one. -
Create a new partition:
Follow the prompts to create a new partition. You can either keep the default size or set the new partition size by using something like “+12GB” for the sector. -
Check that the new partition table is correct
This will display the new partition table. Make sure it’s what you wanted. -
Write the changes to your hard disk
This will save the changes you made to the partition table. -
Resize the file system to fit the new partition size
This command will resize the file system to fit the new partition size. -
Mount your partition
You have now mounted your partition and can start using it with the new size.


And with that, you’ve successfully finished the process to expand Ubuntu partitions from the Terminal.

Key Takeaways
After going through my guide, you should now be able to resize and expand Ubuntu partitions to accommodate your growing data needs.
Here are some important highlights to remember:
-
Before attempting to expand your partitions, it’s essential to back up your data, so you don’t lose anything in case something goes wrong.
-
When expanding system partitions, it’s recommended to boot into a Live-USB key to safely unmount the partition.
-
To expand your Ubuntu partitions, you can use either the graphical method or the command line method.
-
When using the graphical method, you can use tools such as Gparted to resize and expand Ubuntu partitions.
-
If you choose to use the command line method, you need to boot into a live USB key and use tools such as “fdisk” and “resize2fs” to resize and expand your partitions.
-
It’s essential to ensure that the partition you’re resizing is not mounted to prevent data corruption or loss.
-
Finally, always make sure to double-check your work and ensure that everything is working correctly before closing the terminal or shutting down your computer.
As someone who has experienced data loss due to a failed partition expansion attempt, I cannot stress enough the importance of backing up your data before attempting any changes.
It’s also crucial to follow the steps carefully, especially when using the command line method, to prevent any irreversible damage to your system. Remember, it’s always better to be safe than sorry!
If you would like to see a video walkthrough on expanding Ubunti partitions, be sure to check out this clip from SavvyNik.