

If you’re into both video games and Raspberry Pi, you might be wondering if you can run Steam on your Pi devices. Unfortunately, Steam doesn’t have a native ARM client for the Pi so you can’t run it without making a few tweaks first.
Luckily, the workaround to get the official client up and running is relatively simple and easy to perform. In this article, I’ll walk you through everything you need to know about how to install and run Steam on a Raspberry Pi.
Let’s dive in!
# Clone Duino-Coin repository
$ git clone https://github.com/revoxhere/duino-coin
# Install Python dependencies for Duino-Coin
$ cd duino-coin
$ python3 -m pip install -r requirements.txt
What You Need To Install & Run Steam On Raspberry Pi
Here are a few things you’ll need to get started:
- Raspberry Pi 2 or newer
- Power Supply
- SD Card – 16GB+
- USB Keyboard
- USB Mouse
- HDMI Cable
- External Monitor
Click Here For The Best Raspberry Pi Gear & Accessories!

Step 1: Set Up Your Raspberry Pi
As we’re trying to run an x86 application on the Pi’s ARM architecture, we need to prepare the device by following the steps outlined below:
- First, ensure that your Raspberry Pi’s software and package list are updated. You can do this by punching in the following commands in the Terminal:

- Next, we need to install Box86 software, which emulates the non-native x86 architecture on the ARM platform.
This will allow us to run applications that weren’t actually compiled for our Raspberry Pi — like Steam. Check out the official installation guide on the Box86 website for this part.
-
After you have installed Box86 on your Pi device, now we can get started on installing Steam itself
-
To make sure your experience with running Steam involves the least amount of crashes, we’ll first need to install the following packages.

-
Similarly, you’ll need to add some environment variables to your system to help the Steam software run more smoothly and make the experience more seamless.
Make a file called “steam.sh” in the “/etc/profile.d/” directory using the Terminal nano editor.

RELATED: The Ultimate Buyers Guide To RetroPie Games
- Now, inside this file, punch in the following lines of code:

These lines set two new variables: “STEAMOS” and “STEAM_RUNTIME” both to “1”.
-
After you’ve added these lines, save your changes by pressing ENTER.
-
Reboot your Pi device for the changes to take effect using the following command:

Top Tip: It’s worth noting that your experience with Steam on the Raspberry Pi may not be perfect. You may face a few crashes, glitches, and performance issues, as the software relies on an emulator – Box86 – to run.
Click Here For The Best Raspberry Pi Gear & Accessories!
Step 2: Install Steam On Raspberry Pi
After setting up, it’s time to install and run Steam on Raspberry Pi.
Here’s what you’ll need to do:
- First off, we’ll have to download the necessary packages for Steam. Type the following code in the Command Line to do this:

- Now, we just have to install it. You can do this by using the “dpkg” command install (-i) option as shown below:

Step 3: Run Steam On Raspberry Pi
After installing Steam on your Raspberry Pi, you’ll need to know how to open and run it. These steps require having access to the Raspberry Pi desktop, where we will launch Steam.
- After opening the Start Menu, glide over the “Games” sub-menu and click on the “Steam” icon to launch it.

-
On the first startup, Steam may begin auto-downloading a few files, updates, and packages.
-
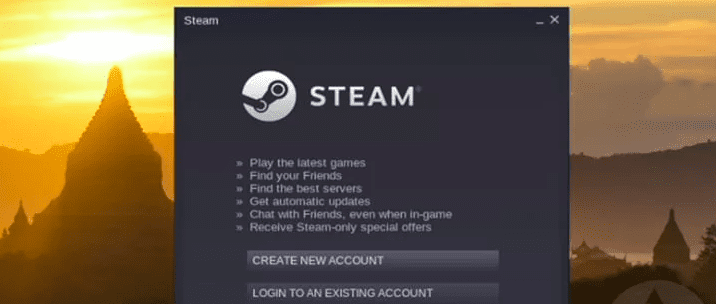
After it’s done downloading, you’ll be asked to log in to your Steam account.
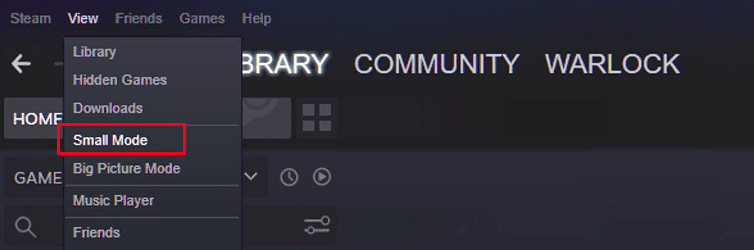
- On the first launch, you may realize that some functions are not available, such as the Games library not loading. To resolve this issue, switch to “Small Mode” or “Big Picture Mode.”
To change modes, tap on the “View” option in the toolbar and choose either “Small Mode” or “Big Picture Mode”. Generally, Small Mode gives the best results and stability, but issues may still arise so be sure to experiment and see which mode works best for your particular setup.
RELATED: The Best Raspberry Pi PC Games
- And with that, you’re ready to enjoy using Steam on Raspberry Pi.
Top Tip: Just remember that the Raspberry Pi doesn’t possess powerful hardware and resources like a normal PC. That’s why it’s recommended to only download and play lightweight games like 2D platformers that don’t require high processing speeds and RAM to run.
Click Here For The Best Raspberry Pi Gear & Accessories!
Alternative Method To Run Steam On Raspberry Pi: Steam Link

While installing Steam on a Raspberry Pi isn’t that difficult, it’s worth mentioning that there is an alternate way to enjoy access to Steam on your Raspberry Pi through Valve’s Steam Link.
Steam Link is an app available for Android, Windows, and Raspberry Pi devices that lets you stream your Steam games over your local network.
Here’s how to download Steam Link on Raspberry Pi:
-
First, turn on your PC (the one you’ll be using to stream from), launch Steam, and log in.
-
Make sure that your Pi device is on the same network as your host PC.
-
To install Steam Link on your Pi device, type the following in the Command Line:

- After it’s installed you can launch it from the Games menu or use the following command in the Terminal:

Using Steam Link has some notable advantages over installing Steam directly on your Raspberry Pi.
For one, you don’t need to worry about compatibility issues or performance limitations since the games are still running on your PC.
Additionally, you can use a game controller with Steam Link to play games more comfortably from your couch or bed.
However, with this method, you’ll need to have a spare PC at hand to do all the heavy lifting. And since the Raspberry Pi is simply going to receive the stream, a weak PC may not be able to provide a smooth and enjoyable experience.
Moreover, you’ll also need a stable and fast internet connection to make sure you don’t experience lag, frame drops, or other issues that’ll negatively affect your gaming experience.
Top Tip: If you run into any hurdles when downloading Steam Link, be sure to check out Valve’s official Steam Link support page to learn how to troubleshoot them.

Final Thoughts On Running Steam On A Raspberry Pi
After following the steps in this guide, you should now be able to install & run Steam on Raspberry Pi with ease.Running Steam on a Raspberry Pi is a fantastic way to expand your gaming options and get more use out of your mini-computer.
Whether you’re a DIY enthusiast or just looking for a fun new way to play games, this guide has provided you with the knowledge and tools you need to get started. So fire up your Raspberry Pi, download Steam, and start playing your favorite games today!