

In the realm of technology, where innovation paints the future, color sensors have emerged as unassuming yet pivotal tools. From the vivid screens of our devices to the precision of industrial automation, color sensing plays an essential role. As we delve into the world of color detection, this guide explores how the Raspberry Pi, a versatile mini-computer, collaborates with Arduino, a microcontroller platform, to bring color-sensing capabilities to life.
Imagine a world without color distinction—no vibrant images, no accurate quality control in manufacturing, no fluid recognition of objects. Color sensors bridge this gap, enabling machines to interpret and react to the colorful spectrum around us. They empower industries, artistry, and robotics to function with heightened accuracy and creativity.
In this journey, we unravel the synergy between Raspberry Pi and Arduino, two stalwarts of the maker community. By combining their strengths, we unveil a realm of possibilities—where Raspberry Pi’s computing prowess and Arduino’s microcontroller finesse converge to enable precise color detection. This guide navigates through the intricacies of setup, programming, and applications, unlocking a palette of opportunities for enthusiasts, creators, and developers alike. Let’s embark on this colorful exploration of technology’s hidden hues.
YOU MIGHT LIKE: Create A Raspberry Pi Airplay Receiver
What You’ll Need
- Raspberry Pi
- Micro SD Card
- Power Supply
- Ethernet Cable or Wi-Fi
- Raspberry Pi Case
- USB Keyboard
- USB Mouse
- HDMI Cable
- Monitor
- TCS3200 Color Sensor
Understanding Color Sensors – A Kaleidoscope of Technology
Color sensors may seem like magic, but at their core, they are scientific marvels designed to perceive the world as we do—through colors. This section delves into the mechanics behind these devices, the variations they come in, and the strengths and limits that define their performance.
What Are Color Sensors and How Do They Work?
At their heart, color sensors are electronic eyes that detect and differentiate colors. They function by analyzing light wavelengths reflected or transmitted by objects. Similar to our eyes, they have receptors that capture light and translate it into data. This data is then processed to determine the color of the object in question.
Different Types of Color Sensors
Color sensors are not a one-size-fits-all solution; they come in various flavors. RGB color sensors break down colors into red, green, and blue components, mimicking the way screens display color. Spectrophotometers, on the other hand, provide detailed spectral information, making them invaluable in scientific and industrial applications.
Advantages and Limitations of Color Sensors
Color sensors shine in scenarios where precision matters. From ensuring consistent product quality to aiding in medical diagnoses, their accuracy is a boon. However, they do have their boundaries—ambient lighting, material properties, and sensor calibration can influence readings. This section delves into both the strengths and considerations that guide their use.
With a glimpse into the inner workings of color sensors, we are primed to venture into the practical aspect of our exploration. In the next section, we’ll dive into the nitty-gritty of setting up Arduino on Raspberry Pi for color sensing.
YOU MIGHT LIKE: Get Your Game On – Set Up Steam On Your Raspberry Pi
What Is The TCS3200 RGB Sensor?
The TCS3200 RGB sensing unit is an affordable, customizable light-to-frequency converter. This neat little gadget is composed of 64 distinct photodiodes which gauge the strength of light falling onto it.
Then, the recorded measurement is converted into a square waveform with an even 50% duty cycle. The resulting frequency aligns directly with the detected light brightness.
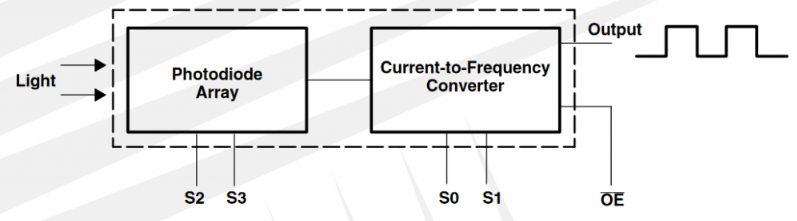
The sensor’s inputs have the capability to modify the device’s functionality. Specifically, lines 2 and 3 serve to adjust the color being targeted for detection, while S0 and S1 control the output frequency scaling. Additionally, OE enables the output when pulled low
S0
S1
Output Frequency Scaling (fo)
L
L
Power Down
L
H
2%
H
L
20%
H
H
100%
S2
S3
Photodiode Type
L
L
Red
L
H
Blue
H
L
Clear
H
H
Green
How To Connect The TCS3200 Color Sensor To An Arduino
Firstly, connect the TCS3200 color sensor to your Arduino by following the below image. If you would like to use fewer pins on your Arduino, you can hard-wire the sensors S0, S1 and OE pins to either high or low, according to the table above.
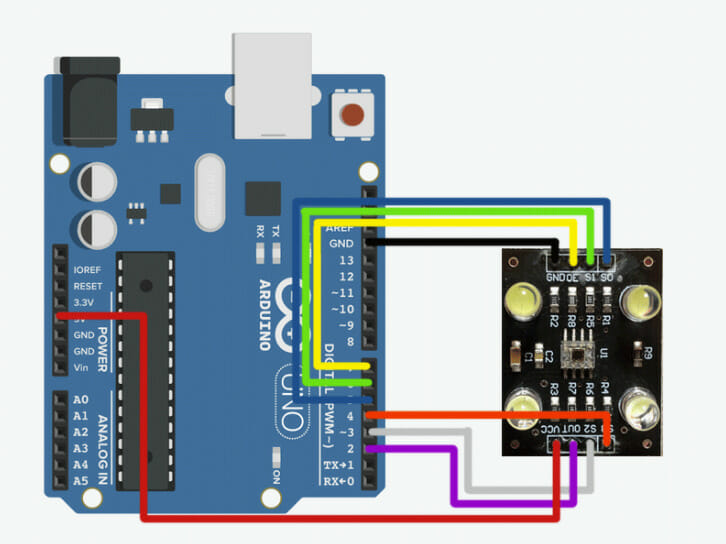
Within the Arduino platform, you can utilize the built-in pulseIn function to gauge the duration of the signal generated by the sensor. This function provides a straightforward way to determine the time elapsed between two consecutive rising or falling signal edges.
YOU MIGHT LIKE: Raspberry Pi VS Jetson Nano – What’s The Difference?
Connecting The TCS3200 Color Sensor To A Raspberry Pi
When using the Raspberry Pi, things become a bit more complex. Unfortunately, unlike the Arduino, the Raspberry Pi doesn’t come with a built-in timer, so there’s no standard function in its library like the Arduino has. This means we’ll need to create our own solution to solve this challenge.
Get started by connecting the sensor to your Raspberry Pi according to this diagram:
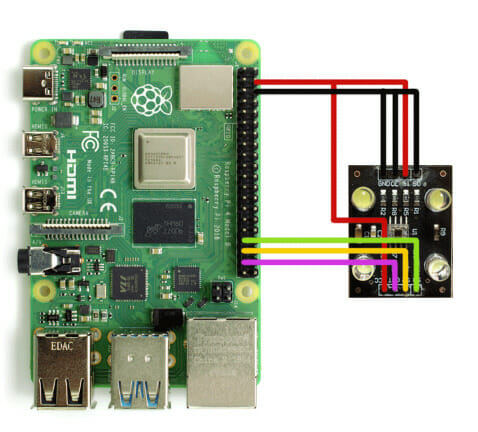
You might notice that we connected the two by using the method I mentioned above in order to use less of the precious GPIO pins. It doesn’t matter if you do this or not, but it is important that you set the smallest possible scaling on the Raspberry Pi.
We did that because the Pi doesn’t have a hardware clock. Rather, we have to wait for a pulse on the output line of the sensor and then get the system time from Linux. Then, when another falling edge occurs, we get the time again and can calculate the difference.
Though this method is not as accurate as a hardware clock, that is the only difference to the Arduino code. The measured time can still be used to decide what color the sensor is picking up.
Final Thoughts
Color sensors have become indispensable components in modern technology, influencing a wide array of applications, from enhancing the vibrancy of digital displays to ensuring the precision of industrial processes. Throughout our exploration, we’ve underscored the collaborative potential of combining the Raspberry Pi and Arduino platforms to enable precise and efficient color detection.
Our journey has provided insights into the inner workings of color sensors, their diverse types, and the practical considerations involved in their implementation. As we bring this exploration to a close, it is important to acknowledge the profound impact that color sensors have on various fields. They not only enhance the accuracy and efficiency of processes but also open up new avenues for innovation and advancement within the ever-evolving realm of technology.