
Sometimes you aren’t able to use a Wi-Fi or cellular network to determine your Raspberry Pi position. Since this is something that some projects require, it seems like a good idea to show you how to work around this!
![How To Use A GPS Receiver With A Raspberry Pi [A Guide]](https://raspians.com/wp-content/uploads/2022/12/How-To-Use-A-GPS-Receiver-With-A-Raspberry-Pi-A-Guide.jpg)
When you find yourself in this situation, using a GPS would be a good idea. This is especially useful if the Raspberry Pi is outside.
That’s why we will be going through how you can connect your Raspberry Pi to a common GPS module, then use the data you get!
Sounds good? Let’s get into it.
Click Here For The Best Raspberry Pi Gear & Accessories!
How To Use A GPS Receiver With A Raspberry Pi [A Guide]
Step 1 – Connect The Raspberry Pi And GPS Receiver
The first thing you are going to need to do is to connect your Raspberry Pi and GPS receiver. This can easily be done with a simple serial connection.
Connect the two devices together by connecting it to the Raspberry Pi’s TX and RX pins. The module’s RX input must be attached to the Pi’s TX output, and vice versa.
Make sure you use the right voltage for your particular device, or else you could run into problems.
amzn_assoc_tracking_id = “raspians-20”; amzn_assoc_ad_mode = “manual”; amzn_assoc_ad_type = “smart”; amzn_assoc_marketplace = “amazon”; amzn_assoc_region = “US”; amzn_assoc_design = “enhanced_links”; amzn_assoc_asins = “B078Y52FGQ”; amzn_assoc_placement = “adunit”; amzn_assoc_linkid = “479fce623f6cc99a65bf266d035ea024”;
Step 2 – Configure The Raspberry Pi For GPS Use
Once the Raspberry Pi and GPS module have been connected, you will need to configure the Pi OS. This must be done so that it has the ability to communicate with the receiver.
Steps may differ depending on the version you have. However, we will walk through the steps required for a Raspbian Jessie version or newer.
You should also fresh install the operating system to be safe. This will prevent you from experiencing any kind of configuration issues when you are first testing your GPS.
You will start the process by running raspi-config:
Sudo raspi-config
This screen should then come up:
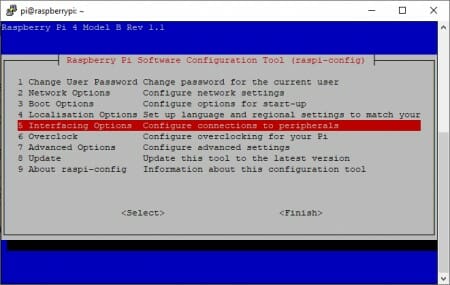
From there, you will need to select ‘Interfacing Options’, then ‘Serial’
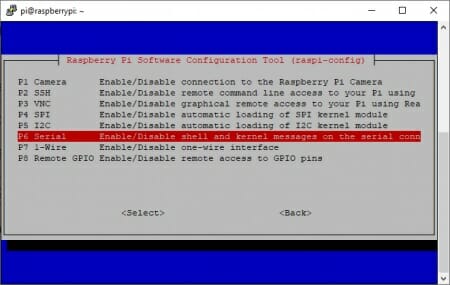
You will now need to disable login-shell access possibility. Do this through the serial connection, then select ‘yes’ when a message comes up if you would like the serial ports to stay enabled.

You will then be taken back to the main menu of the configuration problem. Select ‘finish’, then reboot your Pi device.
Step 3 – Download The Software Needed
Now, you’re going to start downloading all the software you are going to need. Install gpsd and the gpsd-client by inputting this command:
Sudo apt-get install gpsd gpsd-clients
This is an interfacing option that can be used for serial GPS receivers as it supports various communication standards. You can use it to get a reliable test reading to ensure that the hardware is in proper working order.
To get more information about this, simply type in the following:
man gpsd
You will be able to verify data from your GPS module when the installation is complete. Simply output the data that gets sent from the serial port:
Cat /dev/serial0
Your output is probably going to look something like this at first:
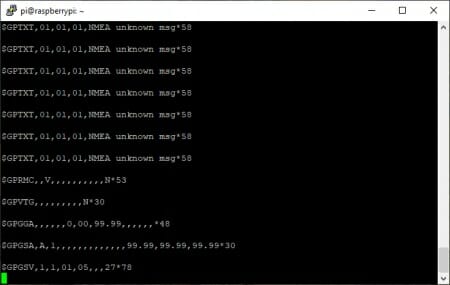
Don’t worry, as it doesn’t really matter that data you are receiving at this point in time. As long as you are receiving something, that’s good!
If the Raspberry Pi doesn’t receive any data or the port immediately closes, you will need to double-check that the module has been properly connected.
It should be easy enough to put in the following command to check this:
Sudo adduser pi dialout
This should tell you what you need to know so that you can move onto the next step of the process.
Click Here For The Best Raspberry Pi Gear & Accessories!
Step 4 – Read The Position Data
The time has come to finally determine your Raspberry Pi’s position! You will need to stop the gpsd service that automatically started when the gpsd was installed earlier.
This is important as the default options it is on are not the right one for the Raspberry Pi. Do this by typing in the following command:
Sudo systemctl stop gpsd.socket
**You will have to input this command every time you want to boot the system. You could also completely disable it by tying in this command:
Sudo systemctl disable gpsd.socket
Now you will be able to run one of the two commands to display the data from your GPS:
Sudo gpsmon
Sudo cgps -s
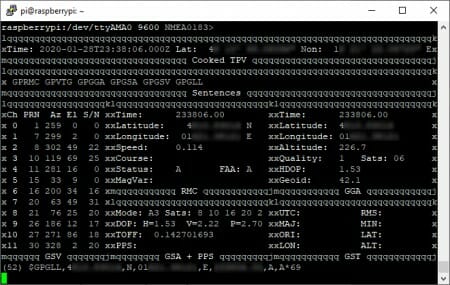
You will likely see something that resembles the image below:
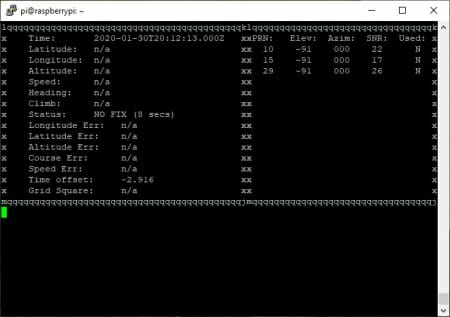
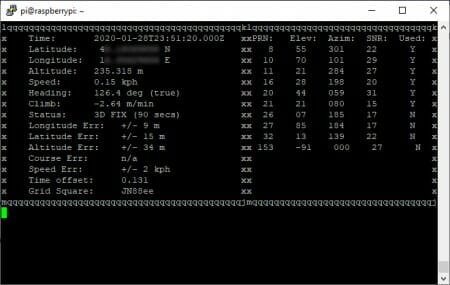
After a few minutes, however, the module will have collected enough data to begin displaying. This will display the position and look something like this:
**Please note that it could take up to half an hour (30 minutes) for the module to determine the opposition of the Raspberry Pi when it first gets booted up. This will especially be the case if you are inside.
To speed up the process, you can point an antenna towards a window or even put the whole module outside or by a window.
If you get an error, type in this command:
Sudo systemctl stop serial-getty:serial0.service
You should then also be able to use gpsmon, too:
Step 5 – Use It!
Now, you should be able to use your GPS receiver with your Raspberry Pi! You will be able to use your creation for all kinds of projects, from a car tracking system to a weather station!
Just remember to use your technology respectfully and properly.

Final Thoughts
Knowing how to locate your Raspberry Pi by using a GPS can be a very handy thing to do. What’s better is that you can then use the data and technology for all kinds of other interesting projects!
You don’t need to spend a lot of money to be able to do this, but you do need to have a basic understanding of the tech involved. No matter the price point, you can get some amazing results – especially if you are able to use the technology outside to collect data faster.