


Are you tired of manually inputting product information when running your business or managing your personal inventory?
If so, then a Raspberry Pi barcode scanner may just be the solution you need.
By setting up a barcode scanner with your Raspberry Pi, you can quickly and easily scan barcodes to retrieve product information and save time.
In this post, we’ll guide you through all the steps to set up and use your Raspberry Pi barcode scanner.
Let’s dive in!
Click Here For The Best Raspberry Pi Gear & Accessories!
Prerequisites For The Raspberry Pi Barcode Scanner Project
Before we get started with the Raspberry Pi barcode scanner project, you’ll need to gather the following hardware components:
-
Raspberry Pi with the Raspbian OS installed (any model will work, but we recommend using Raspberry Pi 3 or later with Raspbian Buster for best results)
-
Barcode Scanner (preferably a USB barcode scanner)
-
HDMI cable and a connected display (for setup purposes)
-
USB Keyboard and Mouse (for setup purposes)
-
MicroSD card (the larger the better)
-
Power supply (5V, 2.5A or higher)
amzn_assoc_tracking_id = “raspians-20”; amzn_assoc_ad_mode = “manual”; amzn_assoc_ad_type = “smart”; amzn_assoc_marketplace = “amazon”; amzn_assoc_region = “US”; amzn_assoc_design = “enhanced_links”; amzn_assoc_asins = “B0B4VCSMHS”; amzn_assoc_placement = “adunit”; amzn_assoc_linkid = “927f0b680d00ef8ba0b5b3edc7f383c4”;
Step 1: Installing The Necessary Software
With your prerequisites in place, it’s time to start setting up your Raspberry Pi barcode scanner. The first step is to install the necessary software.
We’ll be using Python and the PyUSB library to communicate with the barcode scanner, so you’ll need to have these installed on your Raspberry Pi.
To install Python and PyUSB, open up a terminal window on your Raspberry Pi and enter the following command:

This will update your package list and install Python along with the necessary PyUSB library.
Once these packages are installed, we can move on to setting up and testing your barcode scanner to make sure it’s working correctly.
Step 2: Configuring Your Raspberry Pi Barcode Scanner
Configuring your Raspberry Pi barcode scanner involves a few steps to make sure it’s working properly. Here’s what you need to do:
-
Connect your barcode scanner to your Raspberry Pi using USB or GPIO pins, depending on the type of scanner you’re using.
-
Open up a terminal window on your Raspberry Pi and enter the following command to list all of the USB devices connected to your Raspberry Pi:

-
Look for your scanner in the list. If your scanner is not listed, make sure it’s properly connected to your Raspberry Pi and try the lsusb command again.
-
Install a tool called zbarcam using the following command:

- Test your scanner using the zbarcam command as follows:

-
Point your scanner at a barcode and check if the barcode data is displayed in the terminal window. If it is, your barcode scanner is working correctly. If not, double-check your connections and try the zbarcam command again.
-
Once your scanner is working, you can configure it for use with your Raspberry Pi. Create a Python script to read barcode data from the scanner using the PyUSB library (more on this below).
Top Tip: Make sure your USB barcode scanner is set to “Serial” in the “Interfacing Options” menu after connecting it to your Pi device.
Click Here For The Best Raspberry Pi Gear & Accessories!
Step 3: Writing Code To Read Data From The Raspberry Pi Barcode Scanner
Once you’ve tested your barcode scanner and verified that it’s working correctly, the next step is to write code to read barcode data from the scanner.
In this basic example, we’ll be using the PyUSB library to communicate with the barcode scanner and retrieve barcode data. Here’s a step-by-step guide to writing the code:
- First, install the PyUSB library using the following command:

-
Connect your barcode scanner to your Raspberry Pi and make sure it’s working correctly. You can use the zbarcam command we used earlier to test the scanner.
-
Open up a text editor on your Raspberry Pi and create a new Python file. We’ll call this file barcode.py.
-
In your barcode.py file, import the necessary libraries:

- Next, find your barcode scanner using the PyUSB library. Use the find() method and pass in the vendor ID and product ID of your scanner. You can find these values using the lsusb command.

- Once you’ve found your scanner, configure it for use with your Raspberry Pi using the set_configuration() method:

- Finally, read barcode data from the scanner using the read() method:
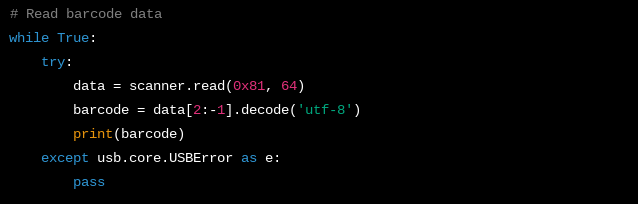
- This code will continuously read the barcode data from the scanner and print it to the terminal window.
By following these steps, you can easily write scripts to read barcode data from your scanner and integrate barcode scanning into your custom Raspberry Pi projects.
Top Tip: If you’re not that comfortable with writing new code from scratch, try using this Github user’s python script to get started with your Raspberry Pi barcode reader right away.

Simply create a copy of the script and type “sudo python barcode.py” to run it (ctrl+c to exit).
Potential Use Cases For Your Raspberry Pi Barcode Scanner
Now that you have a working Raspberry Pi barcode scanner and the code to use in your projects, it’s time to start thinking about how you can use it to solve real-world problems.
Here are some examples of potential Raspberry Pi barcode scanner projects:
-
Inventory management: If you run a small business, you can use your Raspberry Pi barcode scanner USB to keep track of your inventory. Simply scan each item as it comes in and out of your stockroom, and keep a running tally of your stock levels in a database.
-
Point-of-sale systems: If you run a retail business, you can use your Pi barcode scanner as part of a point-of-sale system. By scanning the barcodes on items, the system can automatically calculate the total cost of the purchase and update inventory levels.
-
Library management: If you run a library, you can use your scanner to check books in and out. Simply scan the barcode on each book, and the system will automatically update the library’s catalog and keep track of which items are checked out or overdue.
-
Personal projects: If you’re a maker or hobbyist, you can use the barcode scanner for a variety of personal projects. For example, you can use it to scan barcodes on household items to create a shopping list or to scan barcodes on products to get more information about them.
-
Time and attendance tracking: A Raspberry Pi barcode scanner can also be used to track employee time and attendance. Each employee can have a barcode on their employee badge, and they can scan it when they arrive and leave work.
-
Access control: Lastly, they can also be used for access control, for example, to control entry to a secure area or to track who has entered a building or room. Each individual can have a unique barcode on their ID card that can be scanned at the access point.
These are just a few examples of Raspberry Pi barcode scanner projects you can design and build. With a little creativity, you can come up with many other applications for barcode scanning with your Raspberry Pi.

Key Takeaways: How To Set Up And Use Raspberry Pi Barcode Scanner
Some important key takeaways from this post include:
-
A Raspberry Pi barcode scanner can be a great solution for quickly and easily scanning barcodes to retrieve product information and save time.
-
The prerequisites for setting up a Pi barcode scanner include a Raspberry Pi with Raspbian OS installed, a USB barcode scanner, an HDMI cable and connected display, a USB keyboard and mouse, a MicroSD card, and a power supply.
-
Installing the necessary software for a Raspberry Pi barcode scanner involves using Python and the PyUSB library to communicate with the barcode scanner.
-
Configuring a Raspberry Pi barcode scanner involves connecting the scanner to the Raspberry Pi, testing it using the zbarcam command, and creating a Python script to read barcode data from the scanner.
-
Some potential use cases for a Raspberry Pi barcode scanner include inventory management, point-of-sale systems, and library management.
After going through my tips you should be able to use your Raspberry Pi barcode scanner with ease.
Best of luck and consider reading Backup your Raspberry Pi: How To Save And Restore Files (3 Methods) next.