The Raspberry Pi has many uses. It can work as a desktop computer, wireless print server, or even as a retro gaming machine.
But if you’re a fan of movies and TV shows, you might be more interested in pairing it with your TV and using it as a media center.
This project can be a great way to use an old or spare flat-screen as it only requires a few components and can be completed in a single afternoon.
However, simply plugging your device into your TV and letting it dangle below your flat-screen LED will definitely kill the aesthetics of your living room. That’s why it’s important to mount it properly first.
So, exactly how do you mount a Raspberry Pi to a TV? Well, keep on reading to find out!
Why Mount A Raspberry Pi To A TV?
Let’s be honest, a Raspberry Pi dangling below your TV will still work completely fine as a media center.
However, if you want to use it regularly for entertainment and you’re not a big fan of seeing cords, it may be worth your time to learn how to mount a Raspberry Pi to the back of your TV.
Not only does this give your set-up a much cleaner look, but it also protects your Raspberry Pi and its cables from being accidentally damaged, unplugged, or knocked off. Plus, it will also help keep your device out of reach of your pets and children.
This is why mounting it to the back of your TV makes for a more sensible, aesthetic, and permanent solution.
Click Here For The Best Raspberry Pi Gear & Accessories!
How Do You Mount a Raspberry Pi to a TV?
First and foremost, to properly secure your device and attach it to the back of your flat screen, you’ll need a case like the VESA PiCano metal case to hang the tiny Pi to the TV’s rear.
If you’re not able to get your hands on one, don’t worry you can find numerous other Pi cases on the market that can get the job done as well. But for the purpose of this post, we’ll be talking about the VESA case in particular.
Most televisions have 4 holes at the back with different space settings. Depending on the TV’s size and brand, the spacing might be 100x100mm or 200x200mm.
Although the standard size of VESA is 100x100mm, you can convert it into VESA 200x200mm or 200x100mm using the adapter bracket converter.
These extra sizing options give you the freedom to use it to mount your Pi regardless of your TV size.
It features 2 aluminum panels, and you can house your tiny device on a snug acrylic panel. The Raspberry Pi will be held with nuts and bolts and metal spacers.
Step 1: Build The Case
Once you get your hands on the case, it’s time to get started on building it.
- First, prepare 2 metal outer plates by putting all the case parts together
- Next, attach the Raspberry Pi to the acrylic plate.
- Then use 4 Allen bolts to put the case together
- Finally, attach the acrylic to the base plate, add spacers, and you’re good to go.
At this point, you can choose to lay it flat like a regular case beside your TV or set it up behind it. However, since fixing it to the television screen (see also ‘How To Fix Screen Tearing‘) makes up for a safer option, we always recommend proceeding to the second step and mounting it to the backside of the TV.
Step 2: Attach It To Your TV
Mounting a 100x100mm VESA with a 100x100mm TV spacing is relatively straightforward. However, in case you own a TV of a different size, you’ll need to purchase an adapter.
Fortunately, adapters are pretty cheap. In fact, a few VESA cases include them in the package.
Here’s what to do once you have the required adapter.
- Locate the rubber legs on the PiCano metal case
- Fit the adapters on the rubber legs with the bolts
- Now, attach the PiCano to the back of your TV
Bonus Tip: Remember to carefully look at what kind of case you’re going to get before placing an order. Most Raspberry Pi Zero and Raspberry Pi 4 cases aren’t mountable to TVs. Instead, they are designed to be placed flat on a TV shelf or a side cabinet.
Click Here For The Best Raspberry Pi Gear & Accessories!
How To Connect Raspberry Pi To A TV?
Now that you know how to physically mount a Raspberry Pi to a TV, it’s time to answer the question, “how can you connect Raspberry Pi to a TV?”
Luckily, the flexible and versatile device offers multiple connectivity options, and you can choose the one that best suits your requirements.
The three most popular methods to connect Raspberry Pi to a TV are:
Using An HDMI Cable
One of the best things about the Raspberry Pi is that each model comes equipped with an HDMI port. In other words, if you have an HDMI-compatible TV, you can quickly form a stable connection with your Pi device using an HDMI cable.
You only need to insert the HDMI cable into the Pi board and the other end into the television to connect your TV to your Pi. Simple right?
Using An HDMI To VGA Adaptor
In the event your television lacks an HDMI connector, you’ll need to check if it has a VGA connector instead. Most decades-old TVs and monitors use this D-shaped connector.
Once you locate the VGA connector, you’ll need an HDMI to VGA adaptor to use your Pi device with the TV.
Simply plug the HDMI cable into the VGA adapter and insert the adapter into your TV. Following this, tighten the silver screws on the adapter to keep the cable securely in place.
Using Composite Video Sockets
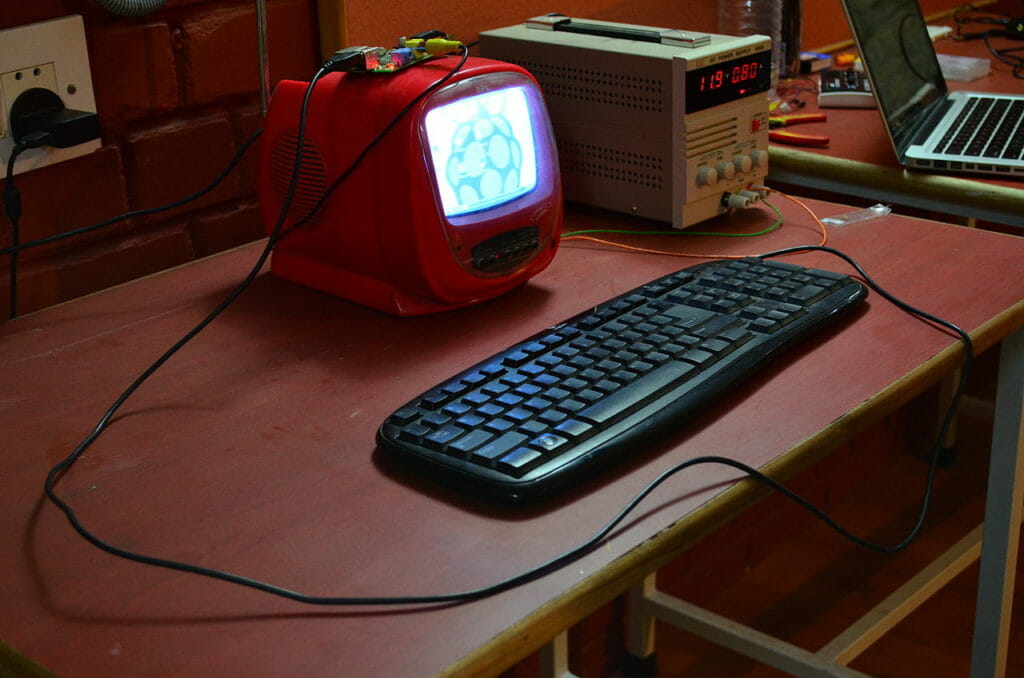
Lastly, if you’re running some really old-school retro displays, you can also use a composite video socket to establish a connection between your Raspberry Pi device and the television.
The only downside is that the image quality is significantly lower as compared to the other two methods and you’ll need an RCA cable (which many of you won’t have lying around in the house).
To connect the Pi using this method, insert one end of the RCA cable into the video out port of your Raspberry Pi device and the other end into the sockets on the TV. And voila, you’re all set!

The Takeaway: How To Mount A Raspberry Pi To A TV
So, there you have it! Now that you know how to physically mount a Raspberry Pi to a TV and understand the different ways to connect it, we’re confident you can set things up on your own without any trouble.
Just remember to be extra careful when mounting the device to avoid damaging the ports. Also, don’t forget to double-check the compatibility of your TV before making a purchase.
For any further queries, feel free to reach out to us in the comment section below and we’ll try to help in any way we can!